We learned that he really likes frisbees and would rather fetch that than a tennis ball. I'm also excited because he's finally learning how to tell us he needs to go outside. We got a bell for our front door and he seems to be doing well ring that. Since he has a short coat and doesn't seem to like being out when it's chilly we decided to make him a shirt even though he will grow out of it soon so that we can start getting him used to it. At the same time, we didn't want to spend a lot of money so we used a child's t-shirt, Star Wars so that he looks super cool when riding around in the Imperial Truck.
Materials:
1 Kids T-Shirt (I used a size 2X)Paper for pattern
Velcro
Thread to match shirt color
Step One: Measure your dog.
You will need to know how long they are along the back, how big around the tummy, and around the neck. I had to get help to hold Gil still long enough to measure and even then he made it difficult by squirming around. Hopefully, as he gets older and better trained that sort of thing will become easier. His measurements were 13 on the back, 18 around his belly, and 10 around the neck.Step Two: Make a pattern and test the size.
I used this tutorial from Sew Doggy Style to make my pattern. Again, I needed help to try it on because Gil didn't want to sit still.Step Three: Align pattern with the shirt and cut out.
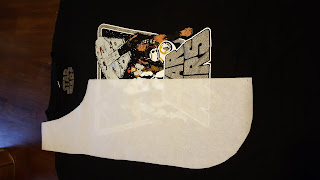
Measure the design on the shirt to find the center and fold the shirt in half. Try to line everything up so that the curve on the pattern matches up with the collar on the shirt.Depending on the size you may need to make a few adjustments, I needed to add a bit onto the shoulders to make that pattern fit. You should be able to cut both the front and back at the same time. Be sure to add a little bit for the seam allowance.
Step Four: Cut and Sew Belly Straps
Use the extra fabric from the shirt to cut the straps. Sew the straps and turn them right side out. Iron flat.Step Five: Sew Shirt
Place the right sides together and pin the straps in place. The straps will be inside. Sew most of the way around then turn everything right side out.I actually forgot to pin the straps in at this point and had to sew them on later. I figure since he will outgrow this shirt soon the seams showing isn't a big deal, plus he's always moving so no one is likely to notice. Iron everything flat and sew the opening closed. I decided to put the opening at the neck because it seemed like he'd be less likely to chew at the seam there but I'm not sure how much difference it really makes.
 |
| This shows where the straps should have been sewn on. |
 |
| This is the front view of where I sewed them on after. You don't really even see it because the strap ends up under his belly. |
Step Six: Add Velcro Closures
Sew velcro along either side of the neck opening and on either belly strap, making sure they overlap correctly. |
| Belly Straps |
 |
| Neck Closure |
 |
| Finished Shirt |
You can really see how it's slipping down around his shoulders in the bottom pictures.


No comments:
Post a Comment